Introduction
In this second post I decided to demonstrate the techniques I follow to assemble and weather a ship model. I have to declare that this is an old file of pictures and thus the images don't speak for themselves. I will be explaining everything however as detailed as I can.The kit:
The kit I have chosen is Revell's 1/142 Northsea Fishing Trawler. A model quite old and rare to find. A model which has less detail than your average 1/700 ship model, yet so attractive and intriguing as an idea to build. Despite its age the kit is surprisingly good. Apart from the lack of detail, the sprues don't fail to protect the parts and the plastic bag keeps dust and moss away. Notice the obvious damage on the box, and yet the parts are intact.
The Assembly
Though parts of the superstructure were pretty easy and straight forward to build, the real problem was the hull. Though let's be fair, you literally can't expect an easy assembly for the hull of an old ship model.
We can clearly see that the thickness of the bow is unacceptable on the two parts, and so I had to sand them thin.
Finally I got to the point that I had to join the halves. It was a real challenge, as they just wouldn't fit. I ended up using plenty of superglue and a handful of rubber bands, clothes pegs, duct tape and whatever I could find to keep the bugger in one piece.
With the thought that the hardest part was finished I moved on to the superstructure. Well, I couldn't have been more wrong! First of all the parts consisting the bridge weren't clearly fitting so a lot of sanding was required, sanding that ended up in many gaps at the finished bridge. And of course how do we cover those gaps? A tone of putty!
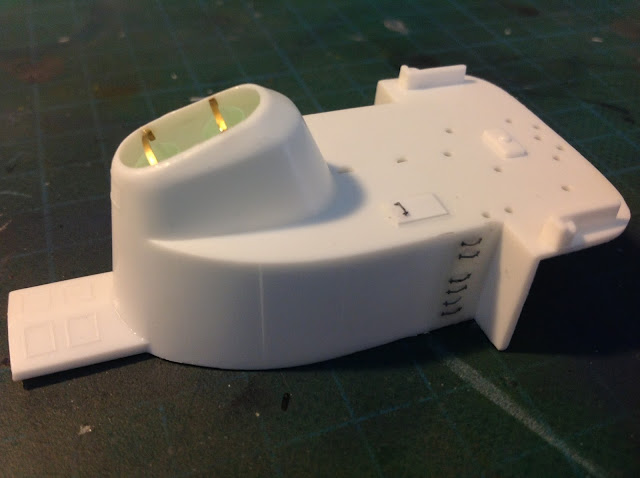
And now I can start talking about improvement techniques! Firstly I had to upgrade the funnel as it was a plain tower with a huge hole in the middle. I stuck two thick drinking straws inside to replicate the pipes from the engine. I also made ti narrow bows of leftover photo-etch frames to make what would be some short of protection. Also removed the God-awful raised ladders from the sides and replaced them with PE leftovers.
Next came the crew compartment underneath the bridge. Here again I had to replace the ladders the same way I replaced them on the bridge, as well as drill the holes for the scuttles and add doors made of styrine and, again, PE. The difference is quite obvious.
The last part that required special treatment was the bow and the anchor machinery. In particular the only thing I did there was drill the holes for the anchor and add a real chain.
So, the kit it ready for painting!
Weathering
Since the painting procedure is standard I decided to skip it. Weathering however, was a new challenge to me. After all this is my first ship to build as an advanced modeler *coughs*.
Let's begin. I started with the streaking, an effect that replicated the salt and rust on the ship, left my the sea water. It can also replicate the worn out wooden planks, which is exactly what I am showing you here. The technique is commonly known as filters. Here is how you do it:
1. Make dots of many different colors of oil paint, emphasizing to those of the general tone you are trying to achieve. For instance, for the wooden deck I used varieties if brown.
2. Use a big flat brush moistened (not soaked!) with enamel thinner or white spirit and move it alongside with the wooden planks, very gently as you don't want the effect to become too dull. Here I have done the same on the hull using more white and rust red.
Then we need some chipping. It is not a common thing to chip ship models, but these particular kit allows so, due to its scale. The easiest, fastest and probably best of the case chipping method is the famous sponge technique.
For the rust streaks on the ship you can either make your own rust tone with oil colors or use market products. Here we see clear rust effects on the back and the bridge of our ship.
Notice in the last picture that the windows on the bridge are made from scratch as well. I painted a large part of clear gelatin black from the one side. The I cut part that fitted the window frames that already existed on the model. Finally, when the ship was finished I glued the new made windows, painted side facing down.
Really, the last thing left to do really was to put the ship together. Only when I did, did I notice that it was too plain. That's why I decided to add some crated on the main deck, to make it more interesting. If you are interested to find out how I make the crates, follow the link, for I have a video tutorial exactly for that.
Link: https://www.youtube.com/watch?v=4fe1ZyVUnpA
And that concludes the -let's say- tutorial for ships. I hope you found it useful, looking forward to uploading a more advanced one in the future. Cheerio!


